Lorem Ipsum is simply dummy text of the printing and typesetting industry. Lorem Ipsum has been the industry's standard dummy text ever since the 1500s, when an unknown printer took a galley of type and scrambled it to make a type specimen book. It has survived not only five centuries, but also the leap into electronic typesetting, remaining essentially unchanged. It was popularised in the 1960s with the release of Letraset sheets containing Lorem Ipsum passages, and more recently with desktop publishing software like Aldus PageMaker including versions of Lorem Ipsum.

Friday, November 1, 2013

Bread

I have been busy trying out different kinds of bread since I stumbled upon an easy no knead bread recipe. Started off quite successful and have  now progressed to sour dough bread. Extras can be stored in the freezer.   No more buying bread from the store!

Here are some photos of the various kind of breads that I have made these last few weeks.  

                                        This is the no knead bread which is very simple to make.


Black Sesame Bun  -  From a cooking class conducted by Mrs. Evon Kow


Sesame bread.  It was nice considering it was the 1st try. The texture was quite soft.  Colleagues all agreed it was good.  Recipe taken from a bread book.


                            Cranberry Toast -  This is really soft and good.  Made with sour dough.


                                                                    Walnut bread

                                                                 Walnut buns,  good with butter


Monday, September 2, 2013

Mini Bak Won (Meat Balls)


Nice fried minced pork ball called 'Bak Won' recommended by Hokkien colleagues.  Thanks to  a colleague's mother-in-law who is a very good cook and happy to share this recipe. This meat ball  has to taste good since there are so many ingredients in it. Good for finger food.  Secure a cube of cucumber to a bak won with a toothpick and I am sure it will  be yum!

Below is an estimation of the ingredients.  The best way to gauge the taste is to deep fry one meat ball and taste it. In this way one can still either add more salt or pepper etc.... to the mixture.

Ingredients:-

300 gms  pork belly (chopped separately)
150 gms prawn meat (chopped separately)

carrot   1/3 stick           )   grated  and then give them a pulse in the electric chopper. take out & set aside
Yam     1/3 (small)        )

1 small big onion           )    chopped them in the electric chopper.
1/2 knob garlic              )

2 water chess nut   (diced)

1/2 egg

Seasoning:     salt, pepper, 2 tabsp soya sauce, 1 tabsp sesame oil,  1 tabsp rice flour
                     (I omitted the MSG)

Method:-

1)    Mix all the ingredients together thoroughly until a bit gluey.  I use a pair of chopsticks.

2)    Heat up some oil in a wok.   With a  spoon, scoop a small ball of the mixture and drop it into the
       oil.  Deep fry until meat is cooked.  To have more crispy meatballs, deep fry them 2 times.

Saturday, August 24, 2013

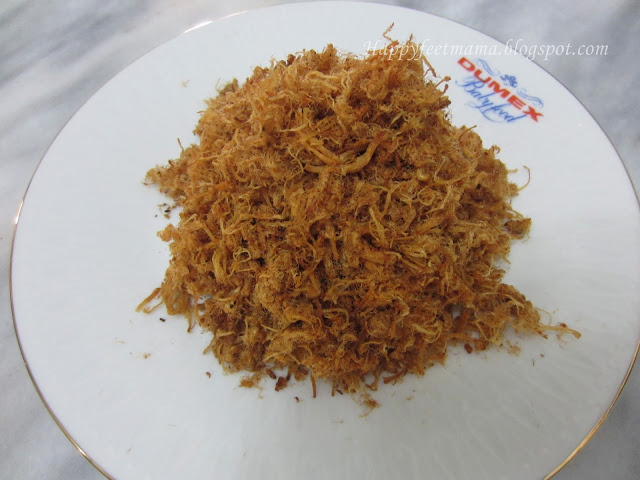
Pork Meat Floss


This is the 2nd time I am making pork meat floss, the 1st time was long long time ago.  I only remember the basic ingredients.  It turned out alright but could be sweeter but colleagues think it is just right. My meat was a bit more than 600 gm according to the butcher.  Anyway not good to eat too sweet!


Ingredients:

600 gm lean pork (wash and cut into cubes)
5-6 tabsp sugar  (more or less according to taste)
3 tabsp soya sauce  (a friend suggested 2 tabsp soya sauce and 1 tabsp fish sauce)
pinch of salt
5 pieces of cloves (ting heong)  - optional

Method:

1)      Put all ingredients into a crock/slow pot and add in water just enough to cover the meat.
         Leave it on for about 6 hours or until meat is tender.

2)     Pour out the meat into a wok and loosen the pork by running  a pair of chopsticks through it.

3)     Fry the pork threads on low fire until dry.  It takes about an hour. Do not leave the meat unattended.
        You have to keep on frying.   It is hard work but the result is satisfying. Enjoy!

Monday, July 29, 2013

Lor Mai Farn - Steamed Glutinous Rice


 I have blogged about this steamed glutinous rice much earlier and I consider  this  an improved version with more ingredients and therefore tasted better.  I am following the method that my friend's mother did. She used to operate a stall selling 'lor mai farn, tong sui', yam cake, radish cake etc.  Though her ' lor mai farn' didn't have all the ingredients except dried prawns, it tasted so delicious... one of a kind I would say.  Even my friend cannot get the same taste even though done the same way.

The ingredients I used here are estimated and you can put more or less as you wish.     Anyway it turned out good according to my colleagues.                                                        


Ingredients:

400 gm glutinous rice (wash and soak for 3 hours and discard water)
1 pair of Chinese sausages  (soak in hot water for awhile.  Remove skin and dice)
4 big Chinese dry mushrooms (soak in water, wash and dice)  - I  marinate it with a bit of sugar and
                                                                                                 oyster sauce.  

100 gm dry prawns  (wash and soak in some water.  Retain the liquid for later use)
some dry scallops  (wash and soak in some water.  Retain the liquid)

Soya sauce, dark soya sauce and chicken stock/granules or  to taste.

Method

1)      Heat up the wok on low fire.  Put in the sausage and fry until fragrant.  Add in the dried prawns and
         dried scallops.  Continue stirring until crispy.  Put in the mushroom to cook another 5 mins.  Dish out
         and set aside.

2)     Heat up a bit of oil.  Put in the glutinous and keep on frying on low fire.  Sprinkle with the scallop/dried         prawn  water and continue frying for about 30mins.  Do not let the rice stick to the wok.
        Last mix  in the dark soya sauce, light soya sauce and chicken stock granules to taste.  
        Dish out the rice and steam for one  hour.
        Sprinkle a bit more water onto the rice and steam longer if it is still a bit hard.  Enjoy.  It is good.
     

Tuesday, July 16, 2013

Fruit Cake


My husband's favourite -  fruit cakes.  So I dug out an old recipe given by my sis-in-law.  Though I didn't follow the actual amount of dried fruits in the recipe, it turned out well.  Being lazy, I just bought a packet of dried fruits and added some dried cranberries which I have in the fridge. My colleagues love it!

Ingredients

285 gm  (10 oz) flour     )
1 tsp salt                       )    A
2 tsp mixed spice          )

225 gm butter
175 gm (6 oz.) castor sugar
5 eggs (slightly beaten)
1 tsp. vanilla essense
4 tabsp brandy

500 gm or more dried fruits  (I added 4 tabsp of brandy to it)    -  B

3 tabsp sugar
2 tabsp water
6 tabsp. evaporated milk

Method

1)       Sieve A    Mix the dried fruits into (A) and set aside.
2)      Caramelize the sugar and water to a dark brown.  Add the evaporated milk and stir over
         low heat to dissolve the caramel.  Set aside.
3)      Cream butter and sugar until light.  Add beaten eggs one at a time.
4)      Put in vanilla essence, caramel and 2 tabsp. of the flour and mix.
5)      Fold in the remaining flour with the dried fruits and brandy.  Mix well.
6)      Pour batter into a 7" greased square tin lined with baking paper and bake at 180 deg. C
         for 1 hour or till cake is done.  Poke in a skewer and if it comes out clean, it is done.
         Enjoy!

Note:    I used two  7"L x 3.5"W x 3"H  tins and bake for 50 mins.

Sunday, June 30, 2013

Honey Chicken


Made this roast honey chicken for dinner last night.  Again my good friend Jo came to the rescue.  Easy to cook and am sure this dish will please any child as it is sweet.

Ingredients:  

2 chicken thighs (deboned)  -  cleaned and marinate with some salt and pepper,
                                                             sesame oil is optional
2 tabsp honey               )
1 tabsp oyster sauce     )     mix together  -  I added 1 tsp brandy


Method:

1)      Spread the chicken meat onto a baking tray with skin down.  Cover with a piece of foil.
         Roast the chicken for 1/2 hour at 200 deg C.  

2)      Remove the tray from oven and discard the liquid.  Put back the chicken thighs onto
         the tray this time with the skin facing up.   Spoon the honey/oyster sauce mixture on top of the
         chicken and roast another 15 mins.(without the foil)  and they should be ready!
          The chicken meat is tender, juicy and sweet. Do not roast it too long, otherwise the meat
          will be tough.
             

Tuesday, June 18, 2013

Bird


Finally managed to capture this little bird that comes to this plant on my porch everyday.  The photos are blur as I have to shoot through a thin layer of curtain and the glass.  It is a very tiny bird and sings too.